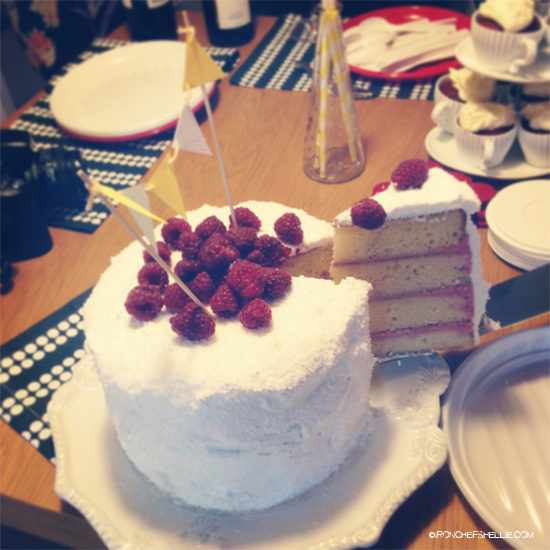
Iced Vovo Layer Cake
Where to start with this one.
There was the part where the two layers didn’t rise enough for me to cut layers, so I baked another two…. And instead of cutting them down, I just levelled them, resulting in an epic cake.
There was the part where I decided assembling a layer cake was a great idea after a glass of highly alcoholic cider (and I barely drink, but felt I deserved some after the day I had). I got 80% there and realised it wasn’t going to fit in the tin so had to take all the layers out, scrape out the mousse, line the tin and start again. It was messy. Very messy.
There was the part where I tasted the frosting and immediately required bacon as my teeth started to hurt from the smallest lick.
And of course there was also the part where my feet nearly turned blue transporting it to Katie’s house. The cake had to remain chilled and thus meant the air-con had to be on.
BUT it was all worth it to see the look of joy on birthday girl, Katie’s face when she saw the epic cake, complete with homemade cake bunting.
I followed a very simple tutorial on Joy The Baker for the cake bunting.
The guests at the party were just as impressed, and once we sang Happy Birthday to Katie in a collective off tune kinda way, the candles were blown out, a wish was made, it was time to cut into the cake. I was scared it wouldn’t look good after all the goofing around I had done with it when trying to assemble it. Everyone held their breath as the first slice was removed. A sigh of relief on my part, it actually looked good! And even after me warning everyone about the diabetic marshmallow frosting; when eaten with the cake and berry mousse it wasn’t sweet at all! It all worked so well together. The fresh raspberries added a fresh relief to it, and I would say they are a must when making this cake.
Happy Birthday again Katie! Can’t wait to see what epic cake I end up making for you next year!!
Summer Layer Cake
Recipe by Valli Little, Jessica Brook & Phoebe Wood
180g unsalted butter, softened
310g caster sugar
3 eggs
1 tsp vanilla extract
2 cups (300g) plain flour, sifted
1 1/2 tsp baking powder
1/2 tsp baking soda
1 cup (250ml) buttermilk
2 titanium-strength gelatine leaves (see note)
125g punnet raspberries, plus extra to serve
250g punnet strawberries, hulled
1 cup (250ml) thickened cream, whipped to soft peaks
1/3 cup (80ml) Malibu or other coconut liqueur
1 cup (90g) desiccated coconut
Marshmallow icing
150g caster sugar
1 eggwhite
1 tsp cream of tartar
30g white marshmallows, chopped
1. Preheat the oven to 180°C. Grease and line the base and sides of two 20cm springform cake pans with baking paper.
2. Beat butter and 200g caster sugar in an electric mixer for 5 minutes or until thick and pale. Add eggs, one at a time, beating well after each addition, then add vanilla.
3. Sift flour, baking powder and baking soda together. In 3 batches, alternately fold the flour mixture and buttermilk into the egg mixture until combined.
4. Divide the batter between the 2 pans and smooth tops with a palette knife. Bake for 35-40 minutes until golden and a skewer inserted in the centre comes out clean. Cool for 5 minutes in the pan, then transfer to a wire rack to cool completely.
5. Meanwhile, soak gelatine leaves in a bowl of cold water for 5 minutes.
6. Puree berries and remaining 1/2 cup (110g) sugar in a small food processor. Strain berry puree through a sieve, pressing down to extract the juice. Place half the strained puree in a saucepan over medium-low heat and cook, stirring, for 3 minutes or until warmed through.
7. Squeeze excess water from gelatine and add gelatine to the warm puree, stirring to dissolve. Strain into remaining puree and chill for 10minutes. Once cool, fold in the cream.
8. Chill berry mousse for 10 minutes.
9. Using a serrated knife, trim the top off each cake to give a flat surface. Carefully slice each cake in half horizontally.
10. Line a clean 20cm cake pan with plastic wrap. Place one cake layer in the pan, brush with one-third of the liqueur and pour over one-third of the mousse. Repeat layers 2 more times, gently pressing down on the cake in between each (the third layer of mousse should come level with the top of the pan). Top with remaining cake layer. Cover with plastic wrap and refrigerate overnight.
11. For the icing, whisk together sugar, eggwhite, cream of tartar and 1/4 cup (60ml) water in a heatproof bowl. Place over a pan of simmering water (don’t let the bowl touch the water) and whisk for 10 minutes or until doubled in volume. (Alternatively, whisk with electric beaters for 6-8 minutes.) Whisk in marshmallow, then transfer to an electric mixer and whisk for 10 minutes or until bowl is cool.
12. Remove cake from the pan and transfer to a plate. Spread the icing over the top and sides, dust with coconut and decorate with raspberries. Serve immediately or chill until ready to serve.
Serves 8-10


Katie
The cake was amazing!! It’s still the background on my phone because it reminds me of how lucky I am to have an incredibly talented friend like you! xx
Nic@diningwithastud
Love it 🙂 the bunting is perfect and your layers look great! All worth it 😉
GourmetGetaways
WOW! Well done! I can’t believe you even attempted the assembly after a glass of cider :0!
Your cake looks exactly like the picture, gorgeous.
Hannah
This is AMAZING. Layer cakes and frosting terrify me!
tania@mykitchenstories.com.au
A labour of love. It looks perfect
Tina @ bitemeshowme
Your bunting looks SO cute. I always have such a soft spot for bunting. Love the sound of the marshmellow icing. Think I may need to give this one a try. It looks great, shellie!!
Heidi - Apples Under My Bed
You’re the sweetest! Love Joy The Baker. Such a gorgeous cake, bravo. & hehe, “iced vovo”, always always makes me laugh.
Heidi xo
Angie
Wow Shellie thAt really is one epic cake! So glad the layers all turned out for you. I think the tall layers makes it look even better than the original 🙂
Daisy@Nevertoosweet
This looks SUPER AMAZING! You’ve done it again Shellie 🙂 gosh I’m so jealous hehe I only got one cake this year for my birthday and it was store bought! I’m gonna have to make myself a cake to make up for it!
I’ve never been able to make multi-layer cakes ~ they always look lopsided hahaha
Thanh
Great effort. Cake looks great to me.
Jodes
Looks amazing… I’m going to start tackling this one tomorrow night for my sisters birthday dinner on Thursday!
I’m planning on using the powder gelatin that I already have.. did you use the titanium leaves like it suggests or powder?
Do you have any idea how many tsp of powder I’d need to use to replace the leaves?
I’ve had a quick look around on the Net and can’t really find a proper answer!
Wish me luck.. Sadly no super cute bunting for mine but you’re looks damn adorable!
Iron Chef Shellie
Hi Jodes,
I did used the titanium leaves. I honestly wouldn’t have the slightest clue how much powder to use sorry!! Good luck 😀
April
That looks so, so amazing! Layer cakes look so impressive and your epic one is super impressive!
Bec
Wow!!! that looks fantastic! this cake was totally on my radar and after seeing it work out in the end for you im putting it on the to do list!
msihua
Super love the look of this cake!