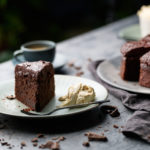
Chocolate Berry Pavlova
Photos aren’t the best as I didn’t think I would blog it. It is the first time I’ve ever tried making a pavlova from scratch. Once I took it out of the oven after it had cooled, it had sunk and it looked like a giant biscuit… so Hamsely described it.
Luckily cream covered the massive crater, and I used thawed out mixed frozen berries, which cost $5, instead of spending $30 on fresh berries…. cos I ain’t that rich!
The results were crispy on the outside, and for the most part, marshmallowy on the inside. I need to perfect cooking the base so there are no sunken cavities. It was still a delicious success though! The chocolate chips in the pavlova are fantastic added bonus 🙂
Nigella’s Chocolate Raspberry Pavlova
Nigella Lawson
Chocolate Meringue Base
6 egg whites
300g caster sugar
3 tablespoons cocoa powder, sieved
1 teaspoon balsamic or red wine vinegar
50g dark chocolate, finely chopped
For the Topping
500ml double cream
500g raspberries
2-3 tablespoons coarsely grated dark chocolate
1. Preheat the oven to 180°C/gas mark 4 and line a baking tray with baking parchment.
2. Beat the egg whites until satiny peaks form, and then beat in the sugar a spoonful at a time until the meringue is stiff and shiny. Sprinkle over the cocoa and vinegar, and the chopped chocolate. Then gently fold everything until the cocoa is thoroughly mixed in. Mound on to a baking sheet in a fat circle approximately 23cm in diameter, smoothing the sides and top. Place in the oven, then immediately turn the temperature down to 150°C/gas mark 2 and cook for about one to one and a quarter hours. When it’s ready it should look crisp around the edges and on the sides and be dry on top, but when you prod the centre you should feel the promise of squidginess beneath your fingers. Turn off the oven and open the door slightly, and let the chocolate meringue disc cool completely.
3. When you’re ready to serve, invert on to a big, flat-bottomed plate. Whisk the cream till thick but still soft and pile it on top of the meringue, then scatter over the raspberries. Coarsely grate the chocolate so that you get curls rather than rubble, as you don’t want the raspberries’ luscious colour and form to be obscured, and sprinkle haphazardly over the top, letting some fall, as it will, on the plate’s rim.
Serves 8-10.


Danielle
Sometimes my Mum puts drinking chocolate in the cream and then grates chocolate over the top (my brother won’t eat fruit). It’s pretty good! But my favourite is when she makes raspberries and jelly and puts that on top of the cream. Yum!
Vien
Pavlova with Berries!!! My favourite!! And now with chocolate??? yumm…
Esz
YUM!
I made mini pavlovas using NQN’s recipe http://www.notquitenigella.com/2010/12/21/surprise-gift-pavlovas/ and they came out perfect. This was after I’d scored 6 punnets of strawberries for $4 late last summer and needed something to eat them with (after having slow roasted them for 2 hours). Perfect dessert!!
Anyways – from that ramble…I reckon making smaller ones might be easier?
Yours still looks great and I bet it tasted 100% awesome 😀
penny aka jeroxie
I have 10 eggwhites. Perfect 🙂
Winston
Oh man… This post makes me feel really conflicted now. On one hand, I’ve always felt too daunted by how pav always require a very good technical skill. On the other, I kinda want a slice of that now…. HMMMMMMMMMMMMM….. Let us know if you managed to perfect it next time round and how. Would love to know so hopefully we don’t make the same mistakes! Haha =)
Michelle
this looks like a huge biscuit!
She Wore It Well
I use the pavlova mix from the supermarket (it comes in a plastic egg). But it still sinks. I think its more the oven temperature and not opening the oven at all until its completely cool than the recipe itself.
My family are huge pavlova fans 🙂
x
mademoiselle delicieuse
But some people aim to have a sunken centre! Perfect for filling with cream and berries.
Michelle Mck
This looks so delicious. I made my first pav at Christmas to use up all of those egg whites from the custard so seeing this makes me want to use another pronto!! I love a few craters in my pav when I eat my mum’s more space for the cream and gooyness (is that a word)
Lizzie (El Moorish)
This recipe (and your results) are complete faceplant material – as in “fork? I’m just going to fall face first into it”. Yuuuuurm!!!!!
msihua
How can you say that the photos don’t look good? That looks amazing! I wouldn’t mind a slice m’dear 😛
Nic@diningwithastud
Delicious!! Love pvs – they’re so damn impressive 🙂 nice work on the frozen berries. I do the same with my pav – they’re so expensive otherwise. I use to put bananas too – think I’ll have to find an alternative at the moment lol
@SuperfoodAnita
Whatcha talkin bout Willis?! Your photos are gorgeous!
Looks like a delish pav! I use frozen berries all the time. So much cheaper and they taste just as good. Although I got 2 punnets of strawberries yesterday at Coles for $4. FDB!
Erin@TheFoodMentalist
Yummo!